Bitmap Tracing (live trace) With Inkscape
Tracing in Inkscape
In my previous post, I compared the tracing capabilities of Inkscape and Illustrator. With CS6 being released this week, I think it’s important to share the benefits of open-source software. I tried tracing an illustration the first time in Inkscape yesterday and I was really pleased with the results. I decided tonight to play with the settings a little more. I will be the first to tell you that I don’t know what I’m doing, but it’s fun to tinker. After playing for a while, I found even better results than what I had yesterday. What I changed was the first threshold and made the number .65 instead of .45. Here is a screenshot of the parameters I used.

The results were better than I could have hoped. I have used Inkscape a lot in the past to draft, so the little clean up that I had took no time. Yesterday, one of the most problematic areas was the bottom of the “O”. It had a hicky at the bottom of the letter. With the new settings, it instantly disappeared.

Important for Those Who Never Used Inkscape
Editing Nodes in Inkscape Compared to Illustrator
For those of you who have had the painful task of editing your anchor points (nodes) in Illustrator with the direct select tool, I want you to know that I share your pain. With each new version of Adobe CS, I long for advanced editing tools. What do we get instead? The paint blob tool, the perspective tool, and the 3-D tool. When will Adobe understand that we want more functionality and less gimmicks. Of all the software at Adobe, Illustrator is treated more like an afterthought than moving the technology further for vector illustration. Editing anchor points haven’t changed since the beginning of digital-publishing time.
In Inkscape, one of the biggest differences you see right away—nodes that are super tiny and difficult to see. Inkscape nodes are HUGE and can be seen from space. There’s no guess work to what’s a point, a handle and a path. Now, it gets better. The ease of editing your path makes this free software a miracle. You have different node modes—corner, smooth, symmetric and smooth, and auto smooth. Now some of this sounds familiar with Illustrator. In Inkscape you can quickly toggle between the different types of nodes without using a crazy convert tool or holding down multiple keys. When you are in the ‘edit paths by nodes tool’ (equivalent to the direct select tool), there are buttons to press at the top of the screen under the main menu.

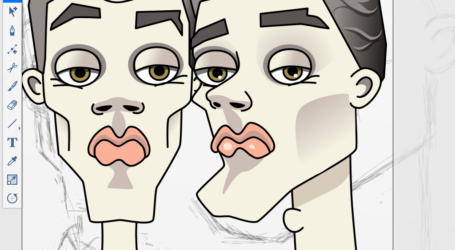
When you select a node, you can click one of the corresponding buttons to change the type of node. The best way to understand how it works is to try it! I think you’ll really dig it. Of all the node types, the autosmoothing nodes are mind blowing. Why hasn’t Adobe made something like this? The closest comparison might be the Smooth Tool which seems like an educated guess at best. And for those of you that love a Quick Key like me, all you have to do is hold down the control key while you click on the node with the node editing tool. Bam! instant node change. I find that creating smooth curves without any dimples or slight bumps. Trying to simulate french curves with paths in Illustrator takes some major effort. Here is the final logo after I tweaked some of the lines. The final result was supposed to look hand drawn. I’m really pleased with the results. Thanks Inkscape. If you haven’t tried it, please download it and give it a whirl. If I get time this weekend, I’ll explain how to use the spiro effect. It will REALLY blow your Adobe-centric mind:)